White noise often messes up a song’s sound by making the mix fuzzy and unclear. It sneaks in like a shadow, hiding the details that make the music shine. Having a clean mix is key for anyone aiming to produce tracks that stand out, whether for casual listening or professional use. Cutting out this unwanted noise feels like wiping fog off a window, revealing the true colors and layers of the music. Discovering how to spot and remove white noise can turn a good track into a great one, making every beat and note pop. Keep reading to find out how to clear the static and make your music sparkle like never before.
In this article, we’ll explore the process of EQing out white noise from a sound or group of sounds in a song.
By following these step-by-step instructions, you’ll be able to effectively reduce or eliminate white noise by dialing in your equalizer settings for a more professional-sounding mix.
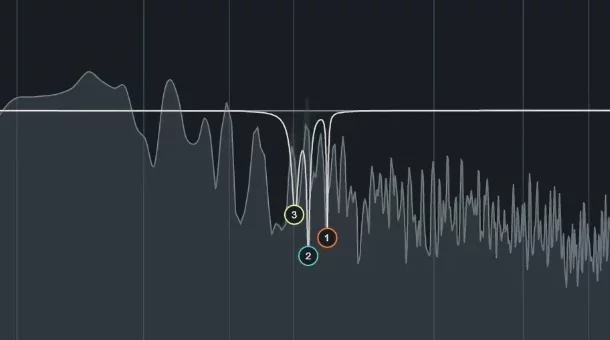
Step 8: Apply Notch Filters
Utilizing notch filters on your EQ with an extremely high Q allows for the removal of white noise while minimally impacting the original audio source.
In some cases, white noise may be concentrated in very specific frequency ranges.
To address this, you can surgically remove these problematic frequencies with a notch filter.
Insert an EQ plugin on the problematic tracks and create a narrow, high-Q notch filter at the identified problem frequency. Adjust the gain of the notch filter to reduce the white noise without overly affecting the original sound.
Step 9: Adjust the Overall EQ Balance
After applying the various EQ techniques mentioned above, assessing the problematic tracks’ overall EQ balance is essential.
It’s possible that some of the EQ adjustments may have resulted in an imbalanced frequency response. Listen carefully to the tracks and compare them to other elements in the mix to ensure they still sound natural and coherent.
Step 10: Fine-tune and Iterate
As you work through the steps, listening critically and making adjustments as needed is crucial.
You may need to fine-tune the EQ settings, notch filters, or noise reduction plugin parameters to achieve the best results. Remember that removing white noise is often a delicate process, and over-processing can negatively impact the overall sound quality.
It’s essential to strike a balance between noise reduction and maintaining the integrity of the original sound.
Step 11: Test the Mix on Different Playback Systems
Once you’ve completed the EQ adjustments and are satisfied with the results, testing your mix on various playback systems is important.
This can include studio monitors, headphones, car speakers, and consumer-grade speakers.
Each system will highlight different aspects of your mix, ensuring that your EQ adjustments have effectively addressed the white noise issue without causing additional problems.
Step 12: Make Final Adjustments
Based on your testing and feedback from others, you may need to make additional adjustments to the EQ, noise reduction, or other processing. Be prepared to iterate on your mix, making small changes and listening critically until you achieve the desired results.
Need more help on the learning the basics of EQing?
If you need more help with EQing, check out all our other EQing guides.
FAQ’s
What is white noise, and why is it a problem in music production?
White noise is a random signal with equal intensity across the entire frequency spectrum.
It can be introduced into a recording through various sources, such as recording equipment, audio interfaces, or certain instruments. White noise can detract from the clarity and quality of a mix, making it essential to address and remove it effectively.
Can I completely eliminate white noise from my mix?
While it may not be possible to eliminate white noise entirely, the techniques outlined in this guide can significantly reduce its presence.
Achieving a balance between noise reduction and maintaining the integrity of the original sound is crucial for a successful mix.
Do I need expensive plugins to remove white noise from my mix?
While there are specialized plugins available for noise reduction, many digital audio workstations (DAWs) come with built-in EQ and dynamic EQ plugins that can be effectively used to reduce white noise. It’s more about the technique and critical listening skills than the cost of the plugins.
How do I know if the white noise issue has been adequately addressed?
A good indication that white noise has been effectively reduced is when the mix sounds cleaner and clearer on various playback systems.
It’s essential to test your mix on different systems, such as studio monitors, headphones, car speakers, and consumer-grade speakers, to ensure the issue has been resolved without introducing new problems.
Can over-processing my mix to remove white noise cause other issues?
Yes, over-processing your mix can negatively impact the overall sound quality. It’s essential to strike a balance between noise reduction and maintaining the integrity of the original sound.
Be cautious with your adjustments, and always listen critically to ensure you are not introducing new problems or causing an imbalance in the mix.
Why is it important to isolate the problematic sounds before EQing out white noise?
Isolating the problematic sounds allows you to focus on the white noise issue without being distracted by other elements of the mix.
By soloing each track in your DAW, you can determine the specific sound or group of sounds causing the problem and apply the necessary EQ adjustments more accurately.
EQ Out White Noise Now!
Removing white noise from a sound or group of sounds in a song can be challenging. Regardless of the white noise FL Studio or in Logic Pro, you can EQ out the noise with EQing.
You can effectively reduce or eliminate white noise by following this step-by-step guide and using a combination of EQ techniques, dynamic EQ, noise reduction plugins, and notch filters.