The way to EQ sounds stays the same no matter what DAW you use, but FL Studio’s EQ has some cool tricks that make it stand out. Its unique tools let you shape sounds with more control and precision, which can make your tracks pop like never before. For example, FL Studio’s parametric EQ gives you detailed adjustments that can fix problems or add flavor in ways others don’t. Knowing these secrets can turn a good mix into a great one. If you want to make your music shine and learn how to use EQ like a pro, understanding FL Studio’s special features is a must. Keep reading to find out what sets it apart and why it matters.
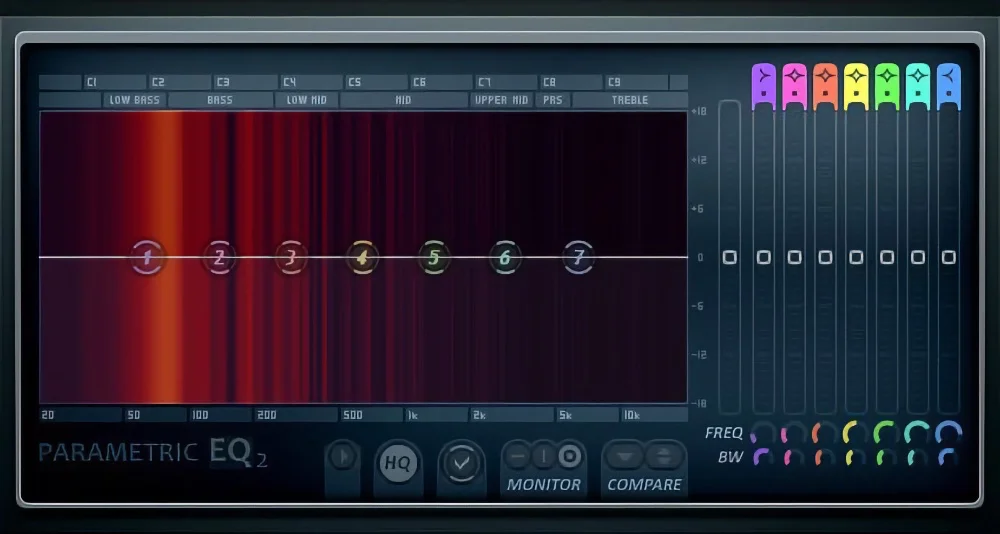
In this article, we’ll explore the basics of EQ and dive into the specifics of using FL Studio’s own Fruity Parametric EQ 2.
Understanding EQ Basics
Case Studies and Examples
To better understand how EQ is applied in practice, let’s look at some real-world examples:
Vocals – Use a high-pass filter to remove low-end rumble, cut muddy frequencies around 200-500 Hz, and boost presence in the 3-5 kHz range.
Drums – Boost the low-end around 60-100 Hz for kick drum impact, cut boxiness in the 200-500 Hz range, and add high-end sizzle around 8-10 kHz for cymbals.
Bass – Use a low-pass filter to remove high-end clutter, boost the fundamental frequency around 60-80 Hz, and cut any muddiness in the 200-400 Hz range.
Analyzing professional mixes can also provide valuable insights into effective EQ strategies.
Additional Resources To Help You Learn How To Use an EQ FL Studio
The general rule is to cut before you boost. Subtractive EQ -- removing problem frequencies -- sounds more natural and preserves headroom. If you need more brightness or presence, try cutting competing frequencies in other tracks first. Keep boosts subtle (2-3 dB) to avoid harsh results.
What is a high-pass filter and when should I use one?
A high-pass filter removes all frequencies below a set point, letting the highs pass through. Use it on most tracks except bass and kick drum to eliminate low-end rumble, mic handling noise, and room resonance. Setting a high-pass filter between 60-120 Hz cleans up your mix dramatically.
How do I find problem frequencies when mixing on fl studio?
Use the boost-and-sweep technique: set a narrow EQ band with a strong boost (+8 to +12 dB), then slowly sweep it across the frequency spectrum. When a frequency sounds harsh or resonant, you have found the problem area. Reduce the gain to a modest cut (-3 to -6 dB) to fix it.
Should I EQ on fl studio in solo or in the context of the full mix?
Always make your final EQ decisions while listening to the full mix, not in solo. A sound that seems thin by itself may sit perfectly in context. Solo mode is only useful for surgical tasks like finding resonant frequencies or removing noise.
How to EQ properly in FL Studio?
Start by identifying the key frequency ranges that define your sound source. Use a parametric EQ to cut problem frequencies before boosting, and always A/B compare your changes. Our step-by-step guide above walks through the exact EQ settings and techniques.
What does Ctrl+N do on FL Studio?
This is an important consideration when EQ-ing in your mix. Our guide above covers the specific frequency ranges, techniques, and settings you need. Follow our step-by-step approach for consistent, professional-sounding results.
What are common EQ mistakes to avoid?
An EQ (equalizer) adjusts the balance of frequency components in audio. It's the most fundamental mixing tool, used on virtually every track. Free EQ plugins range from simple graphic EQs to fully parametric models with spectrum analyzers.
Final Thoughts
EQ is a powerful tool that can make a significant difference in the quality and clarity of your mixes.
By understanding the basics of EQ and applying the techniques discussed in this article, you’ll be well on your way to creating professional-sounding tracks in FL Studio.
Access the Largest Archive of Music Production Tools Ever Created with SoundShockAudio
Subscribe to SoundShockAudio and , including Music Production Apps, Sample Packs, and more.
Take advantage of our comprehensive tools to create music that truly resonates with your audience.
Subscribe today to start creating professional-sounding music with the best tools available.
Need more help when it comes to EQ vocals and other instruments?