Raspy vocals grab attention and bring a unique vibe to music across rock, blues, pop, and R&B. They add raw emotion, like a warm gravel road winding through a song, making every note feel real and close. Many singers use that rough texture to stand out, and listeners often connect deeply with this gritty sound. Fun fact: studies show songs with raspy voices can boost emotional response by up to 30 percent, pulling you into the story behind the lyrics. If raw passion in music sparks your interest, exploring raspy vocals will reveal secrets of why some tracks stick in your mind long after the music stops.
These vocals are characterized by a gritty, textured quality that adds depth and character to the overall sound.
However, mixing raspy vocals can present unique challenges, as the inherent harshness and higher frequency content can sometimes overpower the mix or lead to issues like sibilance and muddiness.
In this article, we’ll cover how to EQ Raspy vocals for a more professional sounding mix.
Understanding Raspy Vocals

Raspy vocals are defined by their rough, edgy texture, which is often the result of a combination of factors, including:
- Vocal cord distortion or damage
- Unique singing techniques
- Natural voice characteristics
These vocals tend to have a strong presence in the higher frequency range, which can contribute to their cutting and attention-grabbing nature. However, this same characteristic can also lead to challenges in the mixing process.
Some common issues encountered when mixing raspy vocals include:
- Sibilance: Harsh, excessive “s” sounds that can be grating to the ear
- Muddiness: A lack of clarity in the lower mid-range frequencies
- Harshness: An overly aggressive or fatiguing sound in the upper mid-range and high frequencies
Essential Tools for EQing Raspy Vocals
To effectively EQ raspy vocals, you’ll need a reliable set of tools and software. Some essential items include:
- High-quality EQ plugin (e.g., FabFilter Pro-Q 3, Waves Renaissance EQ)
- Dynamic EQ (e.g., Waves F6, FabFilter Pro-Q 3)
- De-esser (e.g., FabFilter Pro-DS, Waves Sibilance)
- Compressor (e.g., Waves CLA-2A, UAD LA-2A)
These tools will help you shape the frequency balance, control dynamic range, and tame problematic areas in the vocal recording.
We of course want to get rid of raspy voice sining before it even gets recorded, but this isn’t always possible.
So let’s now go over a step by step on how to EQ and mix a raspy voice.
Step-by-Step For How To EQ & Mix a Raspy Voice
1. Low-End Management

The first step in EQing raspy vocals is to clean up the low end using a high pass filter. This will remove any unnecessary low-frequency rumble and help the vocals sit better in the mix.
Recommended settings for the high pass filter:
- Frequency: 80 Hz to 150 Hz
- Slope: 12 dB/octave to 24 dB/octave
Adjust the frequency and slope based on the specific characteristics of the vocal recording and the desired amount of low-end removal.
2. Mid-Range Adjustments
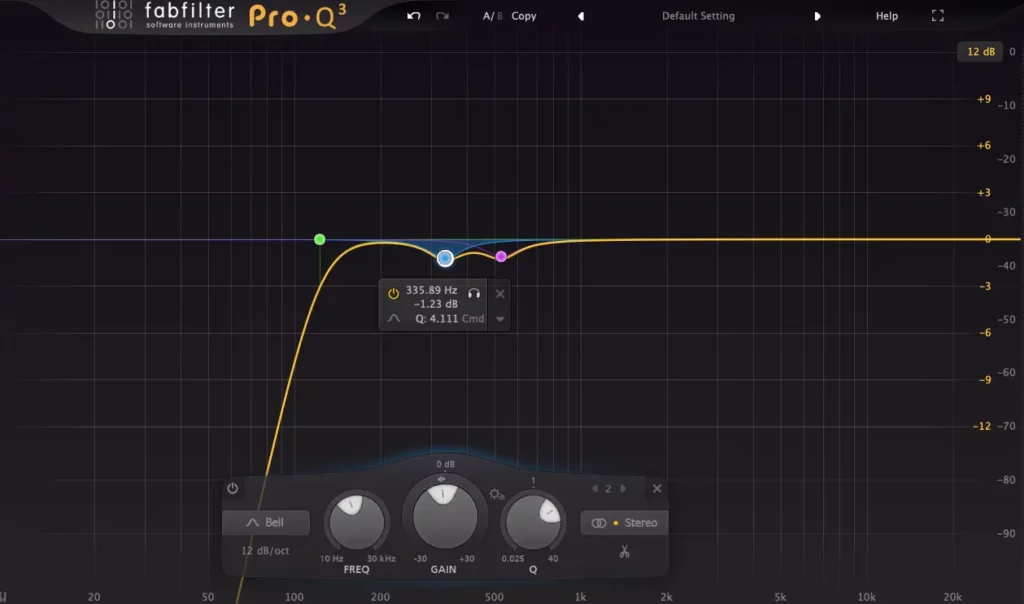
The mid-range is crucial for achieving clarity and reducing muddiness in raspy vocals. Focus on the following areas:
- 200 Hz to 600 Hz: Reduce boxiness and muddiness by applying gentle cuts or using a dynamic EQ to control resonances
- 1 kHz to 3 kHz: Adjust to taste to balance warmth and clarity, being careful not to overemphasize nasal or honky qualities
Use narrow Q values (around 2 to 4) for more targeted adjustments in the mid-range.
3. High-End Enhancement
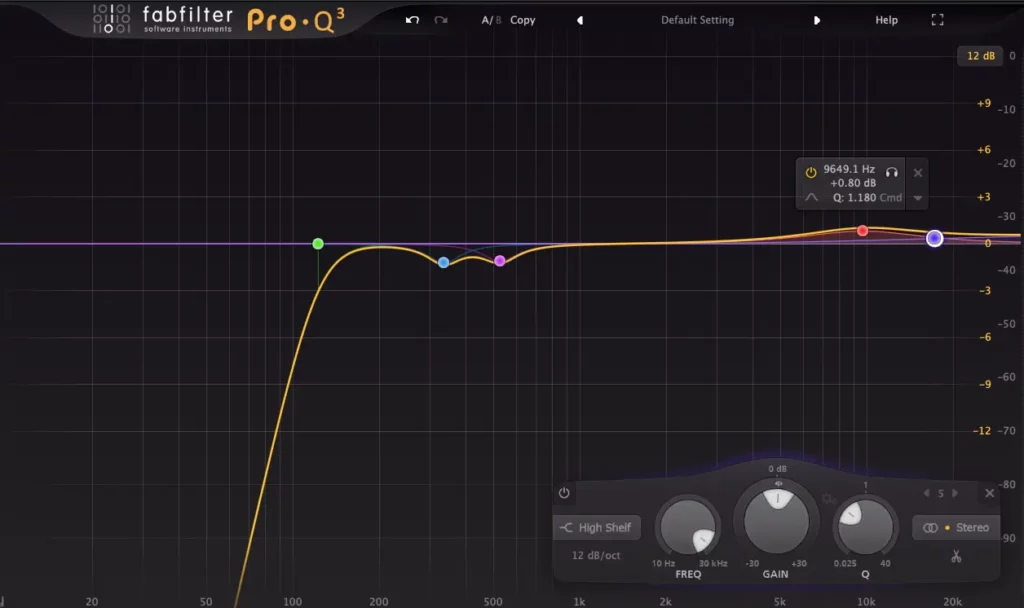
To enhance the presence and airiness of raspy vocals, focus on the high frequencies:
- 8 kHz to 12 kHz: Apply subtle boosts to add brightness and clarity
- 12 kHz to 16 kHz: Use gentle boosts to increase air and sparkle
Be cautious with high-frequency boosts, as they can quickly lead to harshness if overdone. Start with small increments (1-2 dB) and adjust to taste.
4. Dealing with Sibilance

Sibilance is a common issue with raspy vocals due to their emphasized high frequencies. To combat this:
- Use a de-esser to target and reduce the problematic “s” sounds
- Apply targeted EQ cuts in the 5 kHz to 8 kHz range to further control sibilance
Adjust the de-esser and EQ settings based on the severity of the sibilance and the desired amount of reduction.
5. Dynamic EQ Application
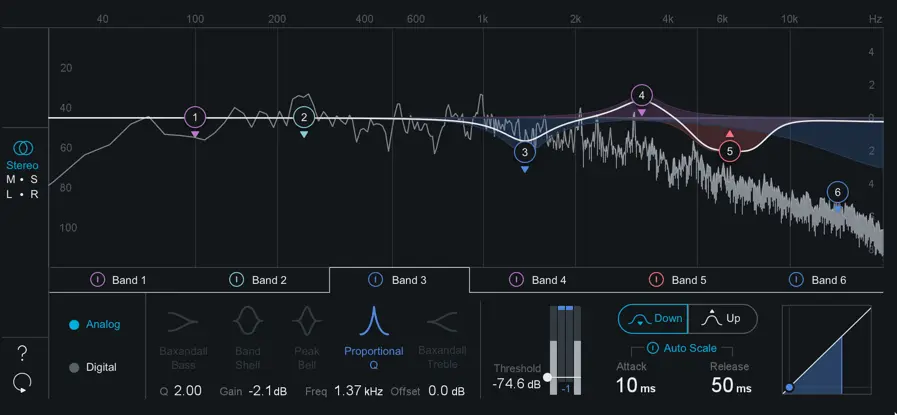
Dynamic EQs are powerful tools for managing frequency peaks that vary in intensity throughout the vocal performance. They allow you to apply EQ adjustments only when a certain threshold is exceeded, ensuring a more natural and transparent sound.
Use dynamic EQs to:
- Control sibilance in the high frequencies
- Manage harsh or piercing moments in the upper mid-range
- Reduce low-mid resonances or muddiness
Adjust the threshold, attack, and release settings to tailor the dynamic EQ’s response to the specific needs of the vocal recording.
6. Saturation and Harmonic Enhancement
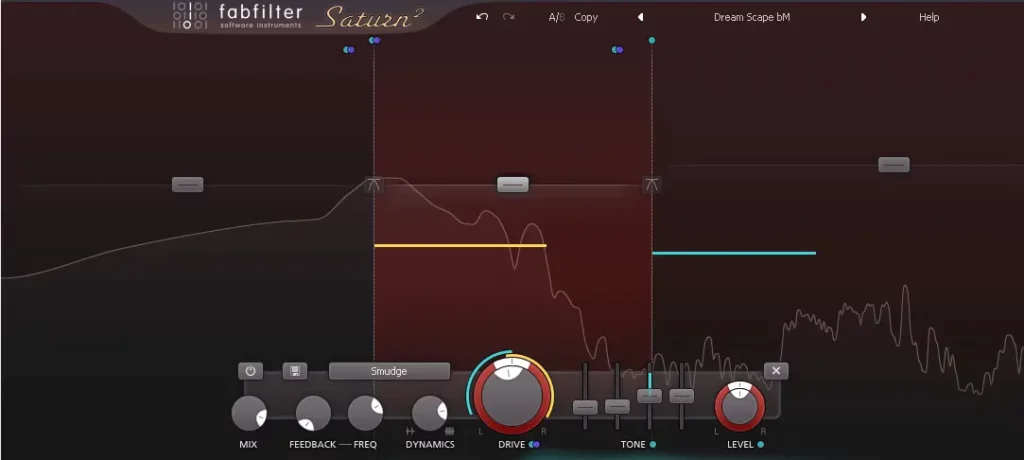
Adding subtle saturation can help enhance the warmth and texture of raspy vocals without overpowering their unique character. Use saturation plugins (e.g., Softube Saturation Knob, FabFilter Saturn) to:
- Add harmonics and depth to the vocals
- Smooth out harsh high frequencies
- Enhance the overall presence and clarity
Apply saturation sparingly, as too much can quickly lead to an unnatural or distorted sound.

Access 4,000+ Music Tools
Access our entire library of music tools including sample packs, VST plugins, DAW templates, and much more.
Common EQ Mistakes to Avoid
When EQing raspy vocals, be mindful of these common pitfalls:
- Over-EQing: Resist the temptation to make drastic EQ adjustments, as this can lead to an unnatural or processed sound. Make smaller, incremental changes and regularly reference the unprocessed vocal to maintain perspective.
- Ignoring the context of the mix: Always consider how the EQed vocals sit within the overall mix. Make adjustments that complement the other elements of the track, rather than focusing solely on the vocals in isolation.
Case Studies and Examples
To illustrate the impact of various EQ techniques on raspy vocals, let’s examine a few real-world examples:
- Vocals: Dan Reynolds’ powerful, raspy voice
- EQ Techniques:
- High-pass filter around 100 Hz to clean up the low end
- Subtle boost around 10 kHz for added presence and clarity
- Dynamic EQ to control sibilance and harsh frequencies
2. “Rolling in the Deep” by Adele
- Vocals: Adele’s rich, soulful rasp
- EQ Techniques:
- Gentle cut around 250 Hz to reduce muddiness
- Boost around 3 kHz for added clarity and articulation
- De-esser to manage sibilance in the chorus sections
These examples demonstrate how targeted EQ adjustments can enhance the quality and impact of raspy vocals in different musical contexts.
Additional Resources
Check out these additional resources to help you with mixing your vocals
Final Thoughts
EQing raspy vocals is a crucial skill for any mixing engineer looking to enhance the clarity, presence, and overall impact of these unique vocal performances.
By understanding the characteristics of raspy vocals, utilizing essential tools, and applying targeted EQ techniques, you can effectively shape the frequency balance and achieve professional-sounding results.
Access over 4,000+ Music Production Tools

SoundShockAudio offers a comprehensive library of music production tools, including VST plugins, Synth Presets, Kontakt Instruments, and more.
Subscribe today to start creating professional-sounding music with the best tools available.
If you are still having trouble with EQing your other instruments, take a look at our other “How To” articles:


hey Daniel, for the raspy vocals stuff, do you think it’s better to start with eq adjustments or jump straight into compression techniques? kinda new to this n wanna make sure i get it right from the start.
Hey Daniel, i need help with the raspy vocals part, do you think these techniques work with any genre? I’m into indie music but it’s always hard to get the vocals right :/
I’ve tried similar steps on my tracks, indie music included, and it made a world of difference. Make sure your EQ plugin is top-notch!
It really depends on the texture of the vocals and the overall sound you aim for. Experimentation is key.
I’ve always found that dealing with sibilance is tricky, but dynamic EQ has been a game changer for me. Would love to see more advanced tips on this, Daniel.
Totally agree! Dynamic EQs are so underrated. Can’t wait to try out Daniel’s suggestions on my next mix.
Nice tips man, didn’t know about the high-end enhancement. gotta try it out on my next session.
Imagine needing 4000+ music tools when back in my day all we needed was a guitar and a dream. This tech stuff sounds wizardry to me lol.
When dealing with sibilance, do you suggest we hiss back at the mic until it behaves? lol, great article though, Daniel.
In the section about EQ VST plugins, you mentioned a 7-day money-back guarantee. Is this a standard policy for most software, or specific to a vendor you recommend, Daniel?
yeah, was wondering the same. trying to budget my gear spendings and policy details really matter here.
Regarding the section on high-quality EQ VST plugins, I’ve noticed not all plugins are created equal. It’s crucial to choose ones with precise controls for surgical EQ adjustments.
I’ve always believed that a good ear and understanding of your instrument’s natural sound are crucial before starting to EQ. It’s interesting to see how this article approaches EQing from a more technical standpoint.
this article is a game changer for real, never thought about dynamic eq that way, thanks daniel!
I find the application of saturation and harmonic enhancement particularly interesting. However, there’s a fine line between enhancing and overwhelming the original signal. Thoughts?
love the advanced eqing strategies mentioned. saturation and harmonic enhancement is where it’s at, been preaching this for years. good on ya, Daniel for highlighting this.
does anyone know a good plugin for dynamic eq? The ones i’ve tried don’t seem to cut it :/
yo this High-End Enhancement is where its at. makes those tracks crisp af. gotta get into dat eq magic more. thx Daniel.
Ah yes, the common EQ mistakes – a rite of passage for all of us. If only this article existed during the analog age, we might have spared ourselves some embarrassment.
Couldn’t agree more! But there’s something about those mistakes that taught us more than any article could.
in the realm of sound, where whispers morph into roars, eqing raspy vocals is like painting on silence. a curious journey, indeed.